Showing posts with label FO. Show all posts

Thursday, January 18, 2007

Completed sock

At my sister's urging I finished the 2nd sock and it did go much faster so thanks Janet for the tip.
The fabric is a looser knit than I wanted. I think I used too big needles for this yarn. Now that I've convenced him to keep them on Mardie likes his new socks. Charmie is begging me for a pair. I see though that if Mardie's feet grow at all these won't fit him since they are almost an exact fit now.
I've got to experiment with making some more socks for them. I'm thinking though that the next pair will be dk or worsted weight but I may use some stash sock yarn.
These were from some Dancing Knit Picks yarn scraps my sis gave to me. There was just enough to make these with less than 5 yards to spare!
I have been turning around in my mind an idea for a scrappy project using sock yarn remnants.
I'm trying to decide if it will be a cardigan front with little squares, or a lapaghan. A dormmate in college made me a scrappy cardigan sweater with squares and like an idiot I either lost it or gave it away after I graduated. I know she put lots of time into that sweater now and I am so sad that I no longer have it.
If you have ideas or scraps to spare let me know!
Posted by Picasa

Wednesday, January 10, 2007

Busy day part 2

After starting the bread, but before finishing it I started my 4th project for the day, mittens for Mardie from this pattern. I finished the first one before dinner and the 2nd one and the tether cord a little while ago.
I added the I tether i-cord to help Mardie not loose them. I will have to thread it through his sleeves tomorrow and see if it's long enough. This is all of my yarn as of right now so if it's not long enough I'll have to frog the cord and crochet a chain it to make it longer. I use Brown Sheep Nature's Spectrum in Sailor Sunset. My sis gave me this ball after she was finished with it, thanks J! It's only 81 yards so I was cutting this really close. I'm glad I had enough to finish. This yarn is 100% wool so these mits will breathe and help his hands stay dry and warm. I am thinking about adding a leather palm and sewing a fleece inner mit but for now that's not happening.
The neat thing about this pattern in my book is tha it has a fat thumb hole which is great for little guys like Mardie. I slipped these on him and had no trouble negotiating his thumb where it was supposed to be. Other mittens or gloves I've put onto kids this age normally end up with multiple fingers in the wrong slots.

I also love how these are like oven mits in that they designed to fit either hand. I will have to knit a pair for Charmie, I really love these mits! Posted by Picasa

Tuesday, January 02, 2007

Bag interior


Here's an inside shot. The interior is quilted with high loft batting for padding. The fabric is sage green fleece for extra padding and to prevent scratches. The top pocket has a Velcro closure and holds several memory cards and a lens cleaner. The pocket in the back has a 5/8" gusset and if you look closely you can see that it holds the battery charger, and when I get one, an extra battery. I'd like to have some extra juice and memory available if I get snap happy!
Here's the camera inside the bag. The strap is covering up the back pocket but I think you get the idea. I may make some additional pouches that hold the usb and av cables to go beside the lens but for right now I don't think I want to carry those around all of the time so for now it's just the camera, battery and memory cards.
I have never designed anything this complex before. I'm really thankful for my job and the recent handbag projects I've been doing as they have given me some ideas for construction that I wouldn't have thought of before. Posted by Picasa

Monday, January 01, 2007

Sockstravaganza!

Here's the mate to the the 2nd pair from my Christmas gift. I had more interruptions with this sock so I had more errors. Socks are not completely mindless for me yet so it takes some concentration for me to make them. I want to find a new pattern for my next pair. I think I know this one by heart by now.
Posted by Picasa

Friday, December 29, 2006

The 13th hour sock

I started this 2nd sock (on the left) yesterday morning at the Dr.'s office. I've been working on it on and off and just finished it up. I took a few breaks here and there, but it's finally done. My first pair of completed knitted socks with heeels. My feet are so happy now!
Time for bed. . . if only I could get to sleep.

Posted by Picasa

Thursday, December 14, 2006

Yeha Picasa's alive!

I was really beginning to freak out. I couldn't connect to BB or anything. Luckily whatever was awry it's resolved after a reboot!
Here's my third cover from the fabric Jo gave me today. Thanks Jo! This cover has so many colors I LOVE to wear, the merlot, plum, sage, and rust. Plus I love the patchy look and geometric quality too. Since it's upholstery fabric it's very sturdy and durable, yet there are chenille threads woven throughout to create the design so it has softness as well.
This handbag and it's covers are just too fun! It's neat to be able to have choices as to what look I want to have in my purse with just slipping on a new cover! Since I'm not a very fussy person I am actually having more fun making the covers than I will ever have carring them! It's neat to see how the bag looks completely different with this simple change.
For all of the purses I've made I finally got it right on the interior pockets too. This is the most pockets I've put into a purse. But now all of the little things I have don't get lost. I have had some little pouches in the past for little things in my purse and those were great to contain things, cute and special to me since they were handmade by people that I care deeply for, but utimately they added weight and I had to get them open to use the contents. With the pockets inside this bag I just have to sort things as I put them back into my purse into the correct pocket and it's ready for me when I need it! Posted by Picasa

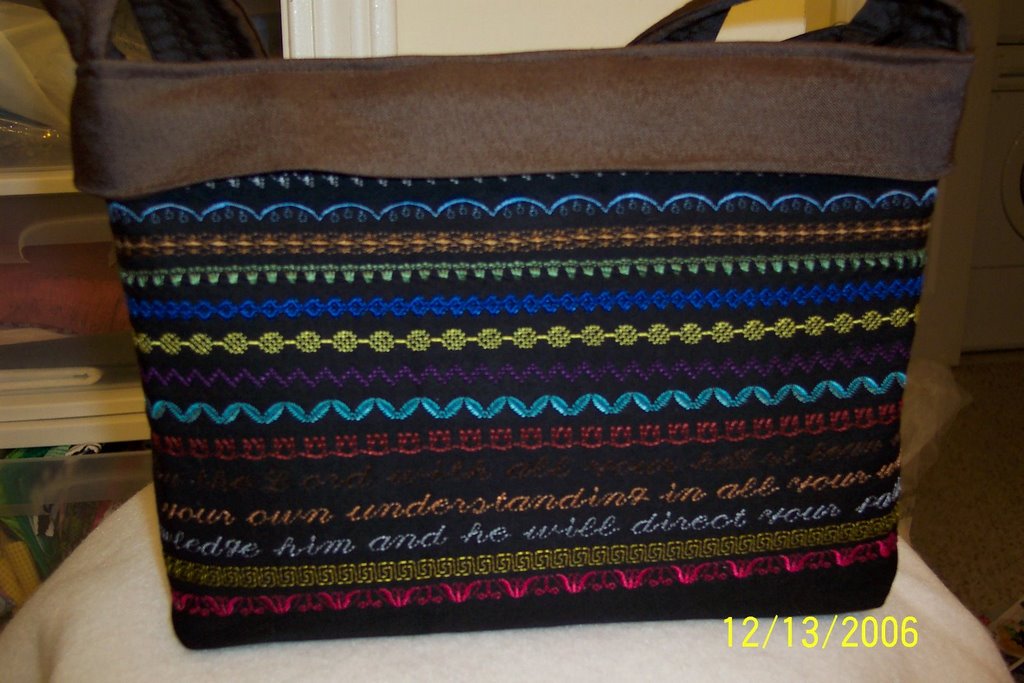
Stitch Sampler Grace Smarthandbag cover

The maker of this pattern used her Pfaff Creative sewing machine to demonstrate stitch sampling on both the Grace and Eliza Jane bags on her site. I really fell in love with the colors and uniqueness of those bags. When I got my pattern I emailed her and asked her how she created this technique as well as one other. She explained how she created the look.
I didn't want patchwork like her bags though so I decided to make my stitch sampler cover with stripes. I used a different color embroidery thread and different stitch pattern for each line.
I wanted to use the monograming feature as well so I picked scriptures that mean something to me to write out.
This side has Proverbs 3:5-6 "Trust in the Lord with all your heart lean not on your own understanding, in all your ways acknowledge Him and He will direct your path."
I am in love with this cover. I had a lot of fun making it. Stitching out 29 rows of decorative stitches does take time though. . . hours of time. The actual construction of the cover once the stitching is complete takes only about 15 minutes though. When I started this one I was wanting to embroider a cover and couldn't settle on an embroidery pattern. I'm happy I made this one instead for now! Posted by Picasa
Side 2 of the Stitch Sampler cover. The scripture on this side is from Proverbs 31:13 - "She finds wool and flax and works with eager hands." Posted by Picasa

Tuesday, December 12, 2006

Mommy's new Grace Smart Handbag

I know it's hard to see in black on black, but here is my Mommy's new bag that I just started and completed earlier this afternoon. I recently found a pattern for a purse called the Grace Smart handbag designed by Georgia at www.thesmarthandbag.com. I loved the concept. I had a bag that allowed you to change the cover like this maybe 10 years ago called the Susan Briganti Push Up bag. I had a size A, my mom a B, and my sis a C. I had two covers for it but sometime last year I sold it and the covers. They stopped making them and they were rather on the expensive side so I couldn't afford as many cover choices as I would have liked anyway. Also, way back, maybe when I was 10 yrs. old after they were cool I inherited a Bermuda bag with wooden handles and 2 button on covers from my sister but I don't remember what happened to it. It's long gone.
Basically this bag unlike the two mentioned above is a stand alone handbag. It's features are a zipper closure lining and organizer pockets inside. Like the others you can change the exterior easily. The neat thing about this one to me is that I can MAKE different covers to match the mood, occasion, outfit, etc. The pattern can be sewn as written or revised for your own needs. I for example changed the handles that the original pattern called for and made a singel strap from the same fabric as the bag because that's what I knew my mommy wanted. I also used a firm fuseable interfacing product like peltex, vs. the fleece and interfacing the pattern called for. I wanted the bag to stand on it's own easily like most ready made bags.
Anyway this is the basic bag, but if you scroll down through my next few posts you can see that I made a few covers for it. The pictures with the covers show more detail since they are not black on black. I want to embroider a cover but haven't gotten that far yet. I believe I also want to quilt a cover. But for now I have made 2 covers from interesting fabrics vs. embelishing them. My mommy like me isn't a terribly fussy lady so I don't think she will be really interested in super elaborate covers.
I will be making one for myself soon for my new handbag. I like the pattern, it was very easy for me to figure out after reading through it and looking through a few photos of completed bags online at various sources. There are quite a few steps to complete it but from the other handbag patterns that I've purchased and made it the past I think that just contributes to this being a well made handbag.
There were two times, both on the first cover's construction and both where I didn't read the instructions exactly as written where I had to redo a step or two, but both times it was easily correctable. The size is very nice too. I'm glad I didn't get the bigger bag pattern, Eliza Jane, that is offered. It would have been too big for my needs! I may however take the idea and make a tote bag. Stay tuned to find out! Posted by Picasa

Wednesday, December 06, 2006

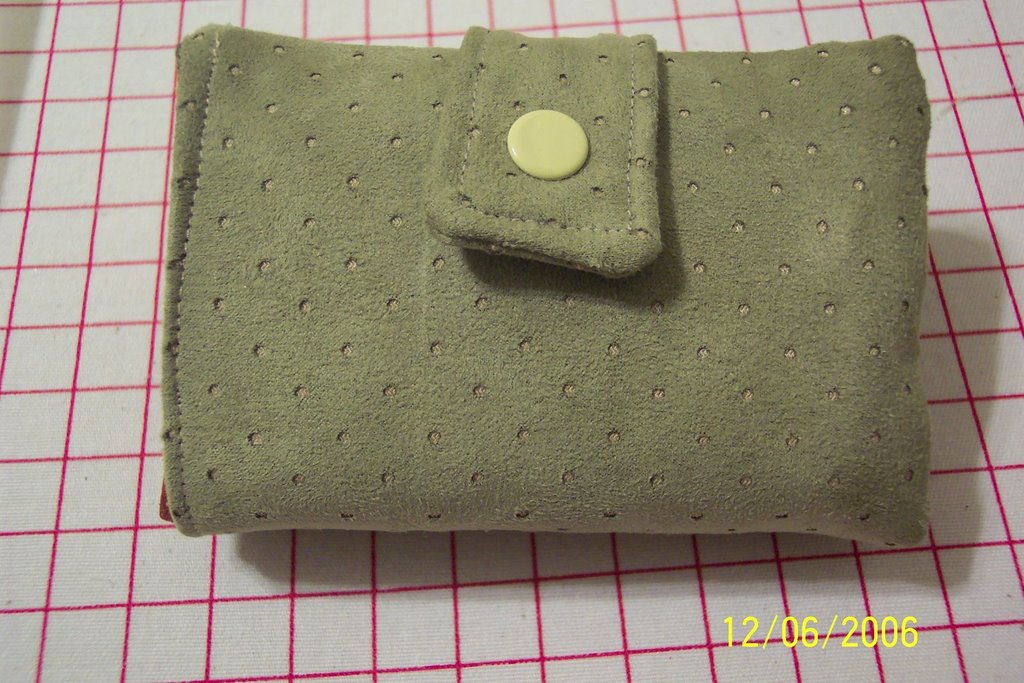
Wallet #2

My first one was getting grubby. The fabric had too much light color and a surface that seemed to attract dirt. Honestly though it was more durable than other fabric, being home decorating fabric, probably intended for curtains or drapes, it was not meant to be handled like a wallet. So, I used some of my ideas from the first and made this one.
I learnded some lessons when making the first one so I luckily didn't repeat them. I am also much more familiar with my machine so making adjustments for the various materials was easier too, like knowing I needed the teflon foot and a sheet of paper any time the vinyl fabric came into contact with the presser foot.
This wallet is approximately the same size as the first one. I like small wallets. It is green micro suede on the outside and a combination of the same and another much lighter weight fabric on the inside.
I'm much happier with the finished product on this one, though there are still things I could tweek.
I think this fabric has a better chance of staying prettier for longer since it's microsuede and the interior is satiny. I don't think that either one will be as prone to attract dirt as the cotton for the first one.Posted by Picasa

Friday, December 01, 2006

all right already

Here are the two King pillow shams I made. The bottom one is face up, the top one is upside down showing the flap opening to stuff the pillow into. Posted by Picasa