Recently we have significantly cut back on TV, videogames and computer time for the kids and guess what? I have new kids! Suddenly reading, constructing a megastructure or drawing an illustrated picture is fun. Imagine that!
I love this and want to wholeheartedly encourage it because it has been kind of a hard transition for the kids from what they are used to and it's my fault for compromising on what I knew to be the case. If they don't have those distractions, they recreate themselves in a more creative way.
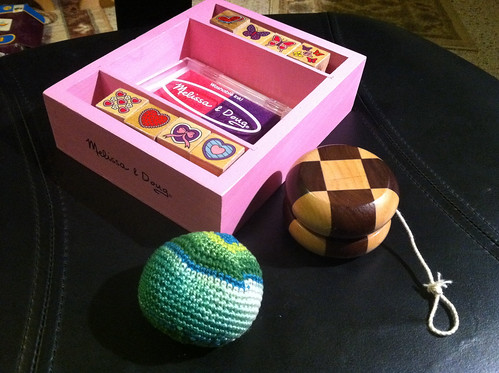
Today when we were shopping for groceries at Yoder's Amish Market, Charmie found a yoyo and Zuri found some stamps (her latest fixation). Mardie wasn't with us because this was his special weekend with his grandparents for his birthday.
I was kind of surprised that Charmie and Zuri were fascinated with the toys they selected. Usually they are interested in Legos or dolls or other more complicated toys. These were simple. . .
I decided to make Mardie's toy since he wasn't there to pick it out. By choosing something different from Charmie, they can both learn new skills, and there should be less competition between them over newly gained skills. Hopefully, I may even see them encouraging one another o.O
Mardie's footbag is made with green embroidery floss and craft thread with a size C hook. The pattern is a free Ravelry download. It was rather quick to make and I stuffed it with Poly Pellets vs. lentils in case it gets wet and needs a cleaning.
I am thinking of trying to make a set of juggling balls as a Christmas present for a special someone who wants to learn how to juggle.
Sunday, September 25, 2011


Saturday, September 17, 2011
Tuesday, September 13, 2011
Studio and School preview
Rocky and I decided we needed to change some things around drastically in our home. Some of that meant spaces we had used needed to go away, some of it meant other spaces had room to grow!
We decided that using the bonus room for 3 purposes was too crowded and that we could enjoy TV/video games could happen just as well in our great room as it could up here, the difference being that we could all be a part of it.
We also decided that since we were homeschooling, a dedicated space would work the best for us all.
Finally, unlike the TV, I have no other place to put my sewing area, so that could stay, but the area is spread out more than it was before.
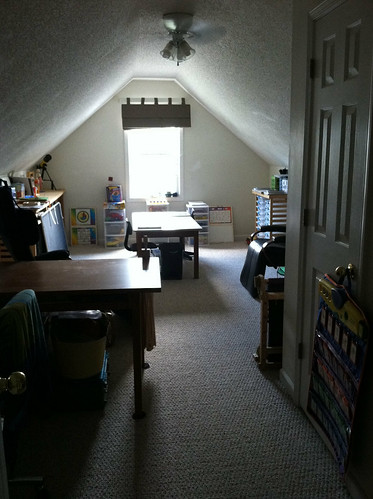
The result, a "real" classroom has blossomed out of the space. It has come together with items that we already had elsewhere for the most part. Few were purchased new, many items were thrifted and purchased 2nd hand some time before.
We finally have room to both work individually and together. The student desks from my previous post are finished being painted, but the tops await final routing and a clear coat to make them more durable.
My Levenger desk is the wooden one in the foreground, facing the window. It was a garage sale steal a few years ago and I have a matching credenza that I use currently to hold my coverhem and embroidery machines and various fiber art items . My anti-gravity and Rocky's massage chairs (black) were purchased shortly after we were married, admittedly, 10+ years of use, especially with the kids have taken their toll, but they are still the most comfortable seats in our home. Continuing from my desk on the left side, Z's desk will be closest to mine, between the bookcases and my chair. These bookcases are actually strong but light weight, unfinished, wooden collapsible display shelves I got for $25 each when my local yarn shop closed a few years ago. They house almost all of my teaching materials, resource books, some manipulatives and displays.
The back wall under the window has plastic drawers with more manipulatives and craft supplies.
The central table is "just right" for all of us to comfortably sit and work together. The height is not so much that it dwarfs the kids, yet I can easily sit at it and my knees fit underneath. We had a full sized dining table in this room originally for the school and it was WAY too oversized, both in height and in girth for the space. This table is sturdy, with solid oak legs and skirting and a formica top, it's 30"x60" size is perfect. I was ecstatic to find it at a Habitat re-store for donated from somebody else's classroom for $10.
Continuing around the room C's desk will sit in the far corner to the left of the workboxes. M's desk will be to the right with Rocky's chair and my cutting table finishing out the space.
We can all be in here at once with separate areas to work and "be". Rocky can use this room for sermon preparation and church business since it will be relatively quiet when we aren't schooling.
This room has had so many "roles" since we moved into this house almost 7 years ago. I am glad we have transitioned to it being used to further our family growth and development!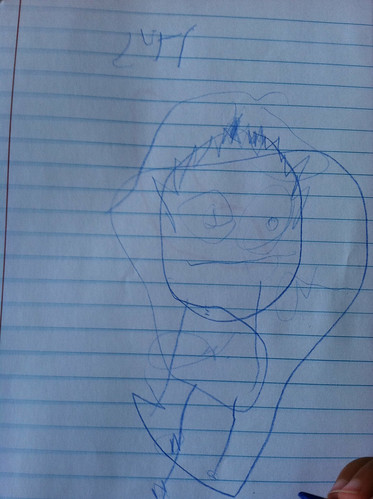
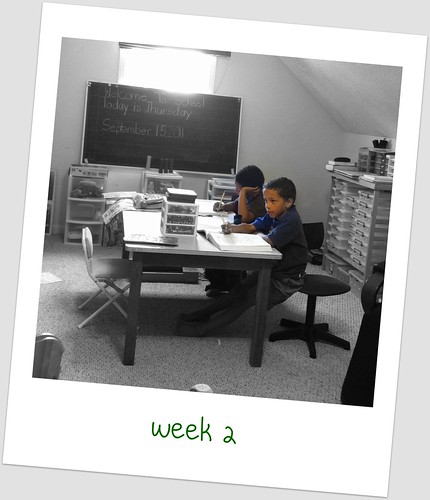
Look what our new creative space has already yielded! Z decided to write her name and draw a picture of me! This is our 2nd week of school! I'm loving it!
We decided that using the bonus room for 3 purposes was too crowded and that we could enjoy TV/video games could happen just as well in our great room as it could up here, the difference being that we could all be a part of it.
We also decided that since we were homeschooling, a dedicated space would work the best for us all.
Finally, unlike the TV, I have no other place to put my sewing area, so that could stay, but the area is spread out more than it was before.
The result, a "real" classroom has blossomed out of the space. It has come together with items that we already had elsewhere for the most part. Few were purchased new, many items were thrifted and purchased 2nd hand some time before.
We finally have room to both work individually and together. The student desks from my previous post are finished being painted, but the tops await final routing and a clear coat to make them more durable.
My Levenger desk is the wooden one in the foreground, facing the window. It was a garage sale steal a few years ago and I have a matching credenza that I use currently to hold my coverhem and embroidery machines and various fiber art items . My anti-gravity and Rocky's massage chairs (black) were purchased shortly after we were married, admittedly, 10+ years of use, especially with the kids have taken their toll, but they are still the most comfortable seats in our home. Continuing from my desk on the left side, Z's desk will be closest to mine, between the bookcases and my chair. These bookcases are actually strong but light weight, unfinished, wooden collapsible display shelves I got for $25 each when my local yarn shop closed a few years ago. They house almost all of my teaching materials, resource books, some manipulatives and displays.
The back wall under the window has plastic drawers with more manipulatives and craft supplies.
The central table is "just right" for all of us to comfortably sit and work together. The height is not so much that it dwarfs the kids, yet I can easily sit at it and my knees fit underneath. We had a full sized dining table in this room originally for the school and it was WAY too oversized, both in height and in girth for the space. This table is sturdy, with solid oak legs and skirting and a formica top, it's 30"x60" size is perfect. I was ecstatic to find it at a Habitat re-store for donated from somebody else's classroom for $10.
Continuing around the room C's desk will sit in the far corner to the left of the workboxes. M's desk will be to the right with Rocky's chair and my cutting table finishing out the space.
We can all be in here at once with separate areas to work and "be". Rocky can use this room for sermon preparation and church business since it will be relatively quiet when we aren't schooling.
This room has had so many "roles" since we moved into this house almost 7 years ago. I am glad we have transitioned to it being used to further our family growth and development!
Look what our new creative space has already yielded! Z decided to write her name and draw a picture of me! This is our 2nd week of school! I'm loving it!
Friday, September 02, 2011
The search for the perfect school desks
We are just about ready to start back schooling. We admittedly took a summer break, though when opportunities arose we schooled in this summer.
My homeschool "space" has been a big frustration to me. I haven't figured out how to find a niche in my home that fits all of the HS stuff I have, and I haven't figured out yet how to cull things down and let things go. So we have cluttered resources and very little space.
Last year I switched from our little "desks", we were repurposing our Babee Tenda Feeding tables, to a table that we could all sit at.
First I had a little one from an old school room. It fit my space, but not my knees (though the kids fit it just fine). Then Rocky found for me a larger table, but we had not accurately measured the dimensions we needed so this table is WAY too big. The space we had is now crowded and not functional for what we need to do. That wasn't the only problem. The kids are all at such different levels, and Mardie and Zuri still need quite a bit of instruction from me, so time at the table all together meant that at least one person was being distracted almost all of the time. I decided we needed to go back to desks and if we want to use a table the kitchen table or bar will work just fine.
My dilemma was that I didn't feel the feeding tables were the best choice. They are sturdy and adjustable, but the lip around the edge kept the kids from having proper ergonomics and they just didn't feel right.
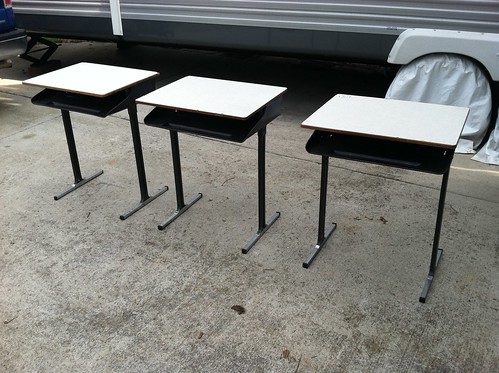
I was very fortunate to find these donated desks at the Habitat for Humanity restore. They evidently had served their purpose at the local community college, and were not going to continue to be used. The original donation was reportedly large, but when I looked, only these 3 desks remained. American Seating, adjustable height, industrial strength that would withstand daily use and grow with the kids through graduation. . .they were EXACTLY what I was looking for! And at $8 each I could not beat the price anywhere!
We are almost finished with repainting the metal parts and just need to figure out the material we will use for the replacement tops. I asked the kids what colors they wanted their desks to be. I will post pictures of them when they are all done and put back together.
This small step will hopefully help our small homeschool space to be maximized again for our use :)
My homeschool "space" has been a big frustration to me. I haven't figured out how to find a niche in my home that fits all of the HS stuff I have, and I haven't figured out yet how to cull things down and let things go. So we have cluttered resources and very little space.
Last year I switched from our little "desks", we were repurposing our Babee Tenda Feeding tables, to a table that we could all sit at.
First I had a little one from an old school room. It fit my space, but not my knees (though the kids fit it just fine). Then Rocky found for me a larger table, but we had not accurately measured the dimensions we needed so this table is WAY too big. The space we had is now crowded and not functional for what we need to do. That wasn't the only problem. The kids are all at such different levels, and Mardie and Zuri still need quite a bit of instruction from me, so time at the table all together meant that at least one person was being distracted almost all of the time. I decided we needed to go back to desks and if we want to use a table the kitchen table or bar will work just fine.
My dilemma was that I didn't feel the feeding tables were the best choice. They are sturdy and adjustable, but the lip around the edge kept the kids from having proper ergonomics and they just didn't feel right.
I was very fortunate to find these donated desks at the Habitat for Humanity restore. They evidently had served their purpose at the local community college, and were not going to continue to be used. The original donation was reportedly large, but when I looked, only these 3 desks remained. American Seating, adjustable height, industrial strength that would withstand daily use and grow with the kids through graduation. . .they were EXACTLY what I was looking for! And at $8 each I could not beat the price anywhere!
We are almost finished with repainting the metal parts and just need to figure out the material we will use for the replacement tops. I asked the kids what colors they wanted their desks to be. I will post pictures of them when they are all done and put back together.
This small step will hopefully help our small homeschool space to be maximized again for our use :)
Thursday, September 01, 2011
Lazy Kate Tutorial
hmmm, I found this in drafts. I guess I should post it.

I built this lazy kate for my Heavenly Handspinning bobbins. It's tensioned and will work if you happen to have 2 sets of bobbins. Here's what you need:
Tools
Saw (I used a compound miter)
Drill with philips screwdriver head, 1/2" and 1/4" bits
Sandpaper either palm sander or sponge block
Ruler
Pencil
2-Clamps
Dremel with sander tip
Materials
1-1x3x4 oak furniture grade board
1-1x2x4 oak furniture grade board
2-3/8" 3' oak dowels
10 Acorn dowel caps with 3/8" hole
1-Shaker peg
Hemp twine
Gorilla glue
4-2" flat phillips head wood screws
1 small screw in eyehook
Instructions
First measure how wide your bobbins are. Mine are two widths so I chose the widest for my measurement. Add .5" inch to that for freedom of movement, 2" for width of the boards and 1.5" for the portion sticking out on either side where the acorns go. I needed 11". Cut 1 lenth of dowel in your measurement for each bobbin you would like to place on the kate. Using the dremel tool and sander tip sand the ends around the diameter until they fit snugly into the acorn caps. On ONE end only place a drop of glue into the cap once you are sure they will fit, then snug on the dowel. Use the glue sparingly as it expands, wipe away any excess. Set the dowels and remaining caps aside.
Now you need to determine how tall your kate needs to be. I wanted mine to serve as bobbin storage and work as a tensioned kate so I needed room for all of my bobbins save the one on my wheel.
My bobbins are 3" diameter at the widest whorl. For 5 I calculated I needed 19". Cut the 1x2x4 into two identical lenghts. Save the remainder 10". You will need it later.
Placing the bobbins down onto one of your pieces largest whorl down carefully measure and mark out their centers on the lenght of the board. Mark one end of both boards as the top.
Aligning the ends you marked in the previous step clamp the boards together and using the 1/2" bit drill through both boards at the same time. Remove the 1/2" bit as you will no longer need it for this project.
Cut the 1x3x4 to 13"
Center the 10" 1x2x4 onto it and mark holes for the screws. Clamp and predrill with 1/4" bit through both pieces. Drill all of the way through to eliminate splits as you screw.
Now comes the tricky part. You need to make a box. Take the 10" section and line it up with the two 19" pieces. Using the hole you already drilled into the 10" piece predrill the 19" pieces into their top end.
Align the side pieces with the end pieces and useing the existing drill holes predrill these side pieces to prevent splitting.
Using 2 of the screws screw these pieces together to form the top and sides of your box. Make sure all edges are flush.
Invert the U and take the 13" section, match the predrilled holes to the centers of your box sides and predrill again into the bottom ends of the box sides.
Using the remaining two screws, attach the bottom. If you know how to countersink the screws a bit the kate will sit flatter and be less wobbly.
Put the bobbins into the kate with the large whorls all to one side.
Lastly drill a hole into the base directly below the largest whorl with a bit that cooresponds to the diameter of the shaker peg end.
insert the shaker peg. Screw the eyehook into the other side of your kate base directly opposite the shaker peg.
Measure your hemp twine twice the height of your kate, plus 3" Tie a small knot into one end of the hemp twine to the eye hook. Tie the other end around the shaker pegs. Take the twine over the top of the kate.
Now you are ready to insert the remaining bobbins. To keep them from falling out cap the open end with the remaining acorn caps but do not glue them.
To tension the kate, wrap the twine around the shaker peg and insert it when taught. Make sure the twine rests in the large whorl of all of the bobbins to gain proper tension.
This kate can be adjusted to any height, though once it reaches a certain height it may be better to use a bigger base for more stability.

Wednesday, August 31, 2011
Two Bihns run errands

Well today I spent some time making over my blog. I hope that it's a pleasure to read for all. I wanted to share something that is a pleasure for me.
In my pages section I have a list called tools of the trade where I feature some of my favorite things. Some of my recent favorites are my Tom Bihn bags. Pictured here are the Little Swift in Vulcana Hemp/Recycled Rubber as my purse and an Shop Bag in Ultraviolet Dyneema as my mailbag.
For years I have searched for a quality, useful bag system and I believe I have finally found it.
I fell in love with these bags way back in 2007 when I was searching for the perfect knitting bag. I found the Swift. I didn't buy one then, it wasn't until the end of 2010 that I finally bought one of their bags, and this year I finally got my first full sized Swift.
n+1. . .
My bags have had babies, and I now have bags for travel, shopping, library trips, the beach, post office runs, day trips, my laptop, edc's and of course knitting.
I love how the organizer pouches fit and clip into the bags to add infinite pockets and organization. Due to the fact that they come in different sizes, and different materials and are removable they work to organize whatever bag I am currently using easily by sight or feel.
I also love the durability of the fabrics and findings, most of them USA made. Many owners from 15+ years report still using their bags as they look nearly new. I love the real cork, recycled rubber/vulcana hemp and Dyneema fabrics. They are so unique and original just to TB bags. They work well in different settings and make the bags very versatile, durable and aesthetically pleasing.
I have yet to find anything that doesn't "go" with the cork or the hemp fabrics in my wardrobe. And I use the Dyneema shop bag (plus his 3 friends) weekly to haul heavy loads of groceries and there is no signs of stress or fail!
The fact that I had the opportunity to go to the factory in Seattle, meet the employees, talk to Tom Bihn himself and see how the business is run (on a day they were not open to the public no less) really makes this company stand apart.
A real business giving Americans real jobs, both in their product, but the resources to make their products. Very rare, and hard to find. To top it all off, Tom stands behind his merchandise and will repair or replace it if it has been through normal use (care instructions) and has failed during it's lifetime. Hardly any company offers this anymore for their products, let alone products that are used daily.
Oh, and these bags make great gifts!
Sunday, August 21, 2011
The rough section
The rough section
Originally uploaded by mom2rays
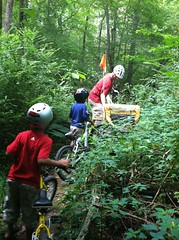
We went for a ride yesterday at a park in Albemarle. I was out of sorts and not prepared for it. So I didn't start my cycle computer app and have no clue on our distance or speed. It was rough through the woods, very uneaven terrain, steep hills, quick turns, switchbacks and even a few downed trees over the path. I believe I need a more skill to do well on paths like this.
The boys had a similar hard time. Their issues were skill and the limitations of their bikes. Today they are sore from using different muscles than they are used to.
Z enjoyed herself being trailered behind Rocky until we stopped for him to try a technical area, she got out of the trailer and was bitten by fire ants.
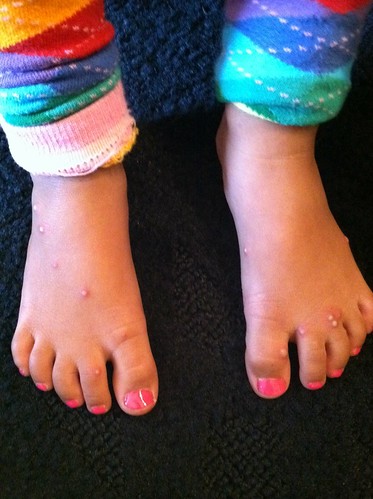
If we do this trail again, I will be better prepared. Actually, I am going to better prepare for all of our future rides. At least the bites occurred after we were clear of the woods and Rocky could sprint to the truck and retrieve our first aid kit quickly. Needless to say, our ride was over after the bites.
Friday, August 19, 2011
No more spider man

No more spider man
Originally uploaded by mom2rays
Zuri has endured using spider man cloth napkins the first 3.5 years of her life. Poor thing. So today I decided to use some assorted girly flannels to make her a set of her own cloth napkins. I think she's pleased.
Monday, August 15, 2011
My 3 year old chef
Z makes some brownies
Originally uploaded by mom2rays
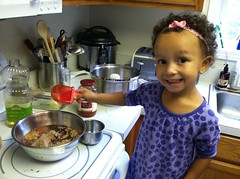
Zuri helps me make some brownies for dessert. She was a great assistant. This was her first time helping me all by herself (without her brothers) I think we will be doing more baking projects going forward. We had a lot of fun baking together :)
Friday, August 12, 2011
Value Village Treasure
Value Village Treasure
Originally uploaded by mom2rays
A little over a year ago I started recreational cycling and got interested in bikes as transportation and for exercise. Right before Higher Ground camp we bought me a Schwinn off craigslist. It was a Hybrid and way too large of a frame, but I didn't know this at the time. It was nicer than my freecycle MTB that weighed a ton and had crappy gearing, but still wasn't a pleasure to ride. I still rode. I rode greenways, I road some park trails, I road around our neighborhood with Rocky and the kids. I gained confidence, I gained more interest, I learned about shifting and about saddles and all kinds of things.
For mother's day this year Rocky bought me a lovely Specialized Ariel Sport Disc and we put 29er tires onto her. I have a bike that can do all kinds of surfaces and is fun to ride for the type of riding I predominantly do.
From the beginning of my interest last year, I fantasized about a vintage Mixte that I custom build up to be a touring bike for road riding only. I looked around, and couldn't really find the perfect bike. I wasn't in a hurry so it wasn't an issue. I found a few but they were not in good condition and $$$. Evidently Mixte's are pretty popular.
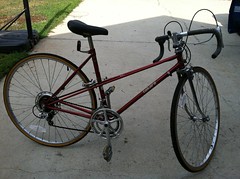
Wednesday I stopped by my Value Village and found this Takara (Treasure in Japanese) Mixte. The price was very right, $18.18 to be exact. She came home!
She's the right size frame, and in very good condition, save cracks in the side walls of her tires.
She's going to need some work to get her to where I want her, but I am so excited to have her, and am looking forward to the project of turning her into what I dream in my mind.
She needs her bottom bracket pulled and overhauled to remove old grease, the handlebars, stem, shift levers and brake levers replaced to a different style and placement. I'm not a fan of drops, especially on this bike. The saddle will also need to be replaced and the tires. Oh and I am probably going to have her painted.
Even with all of that, she truly is a Treasure :)
Wednesday, August 10, 2011
little 5er
little 5er
Originally uploaded by mom2rays
I have been "trying" lately to do exercise at home, for a few different reasons. I am not the greatest though at finding what works. . .
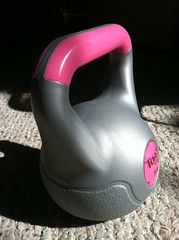
I got a little 5lb. kettlebell and did my first workout today with it. Who knew 5lb. would get a person all sweaty and trembly, lol. I believe I love it, the workout is relatively quick, the equipment is not major, and I don't have to leave my bedroom to do it.
1st workout consisted of 3 sets of 10 reps each:
Snatch Pull & Push Press
Swing
Deadlift
Windmill
and just to see if I could do it I followed up with one set of 2 reps of the Turkish Standup.
Observations:
I can do this
I'm glad I didn't start with the 7.5lb
I think this will combine well with hooping
I feel happy when I KB like I do when I hoop :)
Wednesday, August 03, 2011
hair fun

hair fun
Originally uploaded by mom2rays
I don't know exactly what inspired this, but I did my first twist-out. After my shower, and with no time before Gymnastics I decided to twist my hair into 2 strand twist. It didn't look great, but hopefully the next time I will have more time to make it look better. I left it looking less than great overnight until it dried and untwisted it the following day. I really liked the result. I had more visible length yet still maintained my texture and even some coils.
I usually just wash and go, so it's unusual for me to even try to play with my hair. Hopefully much future hair fun is in store!
Quilt from Aunt Michelle :)
Quilt from Aunt Michelle :)
Originally uploaded by mom2rays
My grandmother passed away July 3. She lived such a full life as wife and mother to 18 children, friend, humanitarian, volunteer, teacher and so much more. It was a blessing to see her 2 weeks before her passing and spend time with her while she was so very much alive and aware.
Thankfully, her cancer didn't linger and rob her of her humanity. It was diagnosed, and then she had a short period of living with it, and then she passed.
She lives on in her 200+ offspring and is well remembered in the lives she touched.
Since we had just traveled to visit, when we had to return for her funeral we decided to take our Travel Trailer. We knew many family members would be coming into town and those who lived locally would do their best to graciously host them, but it would be very crowded at best.
We parked our TT at the family farm in my Aunt's front yard. The farm, her hospitality, family and our private accommodations were such a welcome respite when dealing with the emotional stress of grandma's passing.
We did our best to help out when we could since many of the gatherings were focused around the family farm and we were not responsible for funeral arrangements and other important details as other's were.
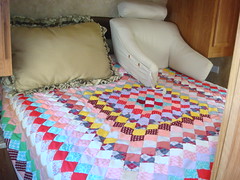
As a thank you, my Aunt Michelle gifted Rocky and I with this beautiful hand seamed quilt, crafted with vintage fabrics.
It is the perfect addition to our Travel Trailer and hopefully the first of many special pieces that hold memories of our family experiences while RVing.
It brightens our bedroom so much I couldn't have picked a better one.
Thank you Aunt Michelle for everything!
Tuesday, July 26, 2011
Camper and mini camper

Camper and mini camper
Originally uploaded by mom2rays
Charmie and Mardie had great experiences this week, but it was hard on them to be separated. They are so used to each other's companionship, friendship, and council that being apart meant they had to either become self reliant or form new alliances. Both are good for them, and both happened. They still got to occasionally see eachother at meal times and certain activities. Here they share a special moment at breakfast. They are happy, but both has a look of longing for the other. My little boys are growing up so quickly into young men!
Camp transportation
Camp transportation
Originally uploaded by mom2rays
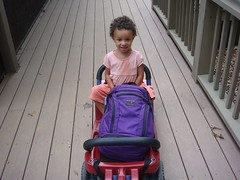
She was pretty good at "guarding" my Tom Bihn Synapse Backpack when I wasn't carrying it.
Walking back to the rig
Walking back to the rig
Originally uploaded by mom2rays
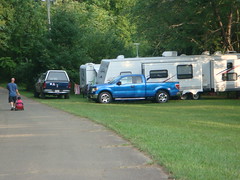
The campus is big and Zuri has a hard time walking all over it, with us camping down below the lower field we were one of the furthest away from all of the activities so she rode a lot in her little red wagon.
camp at camp 2011
camp at camp 2011
Originally uploaded by mom2rays
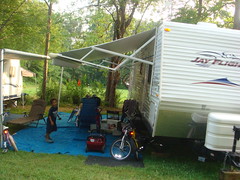
Well here, goes. Yesterday we returned from 9 nights of camping at the Swananoa 4h camp with our summer camp program, Higher Ground (www.carolinacamp.com). It was an exciting year with several firsts.
Charmie was a camper for the first time. We used our Jayco at Higher Ground for the first time. My first time with just Mardie and Zuri as my responsibility during camp. My first time in a drama set to music. Our first time as dorm parents to our own child's dorm.
Camping in our Travel Trailer was very enjoyable from the added room, to the kids having their own space and toys available, to our own bed complete with memory foam mattress, ahhhh, to having our own refrigerator for snacks and beverages. Since we had along our latest family additions, our guinea pigs Buddy and Red and our puppy Princess the TT was especially helpful. Rocky and I realized after this trip, we're finally "camper people".
Monday, April 04, 2011
I think I may start blogging again. . .
I have been so busy with life lately that this blog has been neglected. I haven't meant to stop, it just happened. So much to do with schooling the kids, keeping house, being a wife, crafting and well you know, just living has come between me and the blog, but I think I would like to return to it. I think sharing is a part what makes me, me. I think I have some things worth saying and sharing. I've actually missed posting here.
So I will attempt to blog again.
Thanks Jeffmac from TomBihn forums for encouraging me. Sometimes the simplest question, "what is your blog address" is all it takes. It's embarrassing to direct anybody to come and look here. Right now this blog is a hot mess, but in some ways, it's a reflection of things for me right now. Let's hope things move towards being more calm.
For now, this is all, but I will be back soon.
To my friends who have been waiting, you can expect to see posts again on your RSS feeds.
Thursday, June 03, 2010



Thursday, May 27, 2010


Subscribe to:
Posts (Atom)